Importing NEW Variable Products? Here is Everything You Need to Know about WP ALL IMPORT CSV file formatting!
Are you looking to import new variable products into your WooCommerce store quickly and easily? Look no further than WP ALL IMPORT. This powerful tool easily imports CSV or XML files. In this article, I’ll cover everything you need to know about WP ALL IMPORT, including how to use it to import new variable products into your WooCommerce store utilizing the CSV file format.
Understanding Product Details in a CSV Format with WP ALL IMPORT
Before you start importing new variable products into your WooCommerce store with WP ALL IMPORT, it’s essential to understand the details you are able to define for each product.
These are the column titles for details we use in our CSV file format with our clients:
- Product Type
- Product Name
- Short Description
- Main Description
- Parent SKU
- SKU
- Regular Price
- Sale Price
- Sales Effective Date
- Sales End Date
- Manage Stock
- Stock Status
- Stock Qty
- Product Weight (oz)
- Product Length (in)
- Product Width (in)
- Product Height (in)
- Tax Status
- Color
- Size
- Image(s)
- Tags
- Categories
- SEO Title
- SEO Meta Description
What Styling Can be Used in What Columns of the CSV for Product Setup?
Each column in the CSV file you import with WP ALL IMPORT should contain the data needed to set up your product in WooCommerce properly. For example, the SKU column must contain a unique SKU for each product, while the Stock Qty column should contain the number of products in stock if you’re tracking inventory.
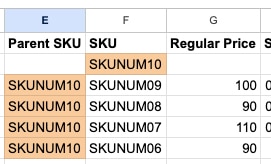
The Parent SKU column is the exception to the unique rule noted above. When utilizing the Linking Variations To Parent Based On Parent SKU (Example 1) setup for your Variable product setup in WP ALL Import, this is Zen’s preferred method of mapping variable products. The Parent SKU column will need to be populated on the rows that represent the variation of the product, with the value seen in the SKU column in the parent product row when formatting your variations.
For pricing, be it Regular or Sale Price, you shouldn’t include the currency symbol in your amounts since that is an unnecessary detail. You are importing into your WooCommerce site and should have already defined your currency. (You can specify the number of decimal places you need in your store in the Woocommerce/ Settings / General / Currency Options / Number of decimals.) The site will understand anything before the decimal points to be a value in your desired currency; for example, 10.00 the site will display this as $10.00 if you choose USD as your currency.
The Formatting Required for a Proper Setup
To ensure a successful import of your products into WooCommerce using WP ALL IMPORT, you need to follow specific formatting requirements for each column. For example, the Sales Effective Date and Sales End Date columns should be formatted as MM/DD/YEAR if your site Data format is set to be Month, Day, Year (m/d/Y), while the Stock Status column should contain either “instock” or “outofstock” (all lowercase and no spaces).
If you are managing stock within WooCommerce to enable stock management on a variable level, you need to enter yes within the Manage Stock column for the products you are tracking inventory for. Then to define the number of units available, you’ll need to enter that value into the Stock Qty column.
Within our sample store, the unit of measurement for weight has been configured as ounces and the unit of measurement for dimensions as inches. When populating the variations’ weight and dimensions (l x w x h), we do not need to include an abbreviation or symbol for the unit of measure since the site already knows what increments are to be used.
When setting up an attribute in the parent row of your product, you will need to use the pipe symbols (|) to separate multiple terms from each other for that attribute. Example: for the attribute of Color, you will need in the parent row to separate all the colors available from one another with a pipe (i.e., Yellow|Green|Blue|Red).
If you are required to capture taxes on your products, you can define the tax status on the products within the CSV. The options available are none (meaning no tax collection), taxable (self-explanatory), and shipping (where the shipping of the product needs to be taxed). For additional information about what products are tax-exempt or not for your line of business, you should consult a tax professional.
Images are an essential way to show customers what they are buying. You can add multiple images within a single row for your parent product. Importing with WP ALL Import, you can define that commas separate the images. During the import configuration, you can set that the first image within the column is to be used as the featured image, and the others that follow should be loaded into the gallery.
When setting up your import template, you can choose where the import will look for images.
The options are:
- Import them from your media library
- Import for the /wp-content/uploads/wpallimport/files/ folder within the site’s files structure
- Import from a site using the image file URL.
Our preferred method is either to have the images uploaded to the media library or add them to the /wp-content/uploads/wpallimport/files/ folder via SFTP, then allow the import to match the images to the products. With these methods, in order to have a successful mapping, the title of the file in the CSV and the file in the site must match fully.
The site will not know that an image uploaded as ‘samamntha-tassey-upload-demo.jpg’ and the image defined as ‘samantha tassey upload demo’ within the CSV are the same file.
When the upload of ‘samantha tassey upload demo.jpg’ occurs, the system will add dashes where the spaces are.
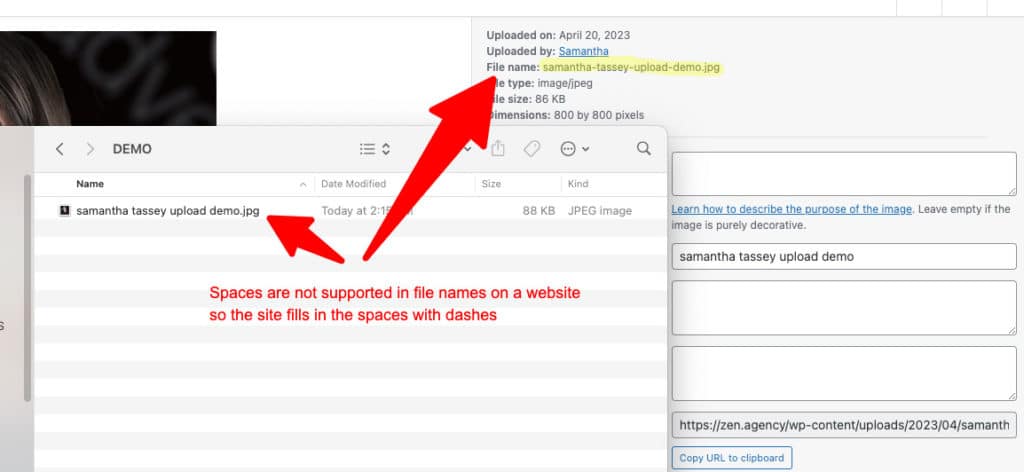
So to properly map the image, the CSV file should have samantha-tassey-upload-demo.jpg as the image name.
Be sure to make sure to include the image file format (i.e., .jpg, .png) when naming your files in the CSV.
The category structure can also be set up via the import; you can choose to link a parent product to a single category, multiple categories, or a hierarchy of categories. We recommend that you use a pipe symbol when separating categories from one another (i.e., Category A | Category B). We recommend the greater than symbol (>) to show the parent-child relationship with categories to show hierarchy. If multiples exist, use the pipe symbols to differentiate between the two families (i.e., Parent A > Child A | Parent B > Child B). Variations are linked to the categories that the parent is linked to. You can not link the variation to a category (i.e., Category B) and link the parent to another category (i.e., Category A).
Importing Products into WooCommerce with WP ALL IMPORT
Now that you understand the details, styling, and formatting required for a proper setup, let’s take a look at how to import products into WooCommerce using WP ALL IMPORT. Here’s a generalized step-by-step guide:
- Install and activate the WP ALL IMPORT plugin on your WordPress site.
- Create a CSV file with the product details for the columns needed.
- In WP ALL IMPORT, navigate to “Import Products” and choose your CSV file from your desktop.
- Map the columns in your CSV file to the appropriate fields in the WooCommerce import template with the drag-and-drop functionality. (Be sure to check the settings you desire, i.e., Set the first image to the featured image (_thumbnail_id))
- Run the import and wait for it to complete.
That’s it! With WP ALL IMPORT, importing products into your WooCommerce store has never been easier.
Closing
In conclusion, WP ALL IMPORT is an essential tool for anyone looking to quickly and easily import products into their WooCommerce store. By understanding the product details, styling, and formatting required for a proper setup, you can ensure a successful import using this powerful tool. Whether you’re importing a handful of products or thousands, WP ALL IMPORT is the way to go.
If you’re ready to get started with WP ALL IMPORT and still have some questions, be sure to check out their documentation on importing WooCommerce products using CSV or XML files at https://www.wpallimport.com/documentation/how-to-import-woocommerce-products-csv-xml/. With WP ALL IMPORT and this guide to setting up your CSV file, you’ll be importing products into your WooCommerce store like a pro.
If you encounter any issues or need further assistance with your WooCommerce product imports, please don’t hesitate to contact Zen Agency. Our team of experts can help you optimize your product setup and ensure a successful import using WP ALL IMPORT.
FREE! WPALLIMPORT Variable Product CSV Cheat Sheet!
Subscribe to our newsletter, and we will email you two CSV files. One will be a sample CSV file with two variable product setups with the columns noted in this article. The other is a quick reference key to tell you what information goes in what column and what formatting or additional requirements you need to remember when populating the column.